Tuesday 14 August 2012

Critical Evaluation in Safety

Critical Evaluation In Safety

- Rider is wearing gloves, a helmet but no glasses, and therefore is not meeting the safety requirements in the area of their attire.
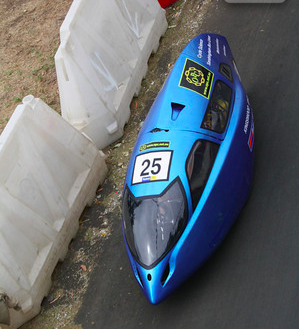
- No obviously sharp edges or protruding bolts, therefore design is safe in that area.
- The design is free of protrusions and is not capable of causing harm to fellow competitors or spectators.
- The rider is wearing knee and elbow pads, and an approved bicycle helmet.
- The design does not provide protection for the rider in the event of a collision or rollover - the rider would probably fall and injure themselves badly if that situation were to occur.
- The riding position appears to be of an acceptable angle, and would not cause the rider back injury. The seat is shaped in such a way that the rider will not slip under the seat belt. The seat appears secure and locked into position.
- The bike has an appropriate seat belt.

Overall, this design meets safety in most areas, however one outstanding safety issue would be the injury that could occur in the event of a rollover. It is probable that the rider would fall out and seriously injure themselves, making this an extreme safety hazard. There is nothing stopping the rider form falling out of the bike. Also, the rider is not wearing safety glasses, which could also pose a safety risk.


Saturday 11 August 2012

Energy Breakthrough Design

P - The rider is protected by a sturdy outer shell in case of an accident.
M - The front is rather pointy, posing a safety hazard if someone was to be hit by it.
I - The outside appears to be made out of metallic materials, or otherwise dense material.


P - Easy to get out of if a accident was to occur.
M- No outer shell protection for the rider if an accident was to occur.
I- No outer shell - I wonder if there was a particular reason for this?

P- Has no outstanding safety hazards - outer shell appears sturdy and no definite point at the front.
M- Quite small and light looking - would not hold up well in windy conditions or other bad weather.
I- Smaller than most other bikes.

P- There is someone wheeling the rider and two people are better than one in the case of an emergency.
M- Rider does not have much outer protection as there is no outer shell.
I- Someone else besides the rider is controlling the bike.


Thursday 23 February 2012

How to Use a Cube File

A cube file is used for sanding parallel with the wood, giving a straight finish on edges. The following is a video on how to use the cube file:


The cube file is perfect for filing the whole edge of a piece of wood evenly and making sure it is perfectly straight. Like other files, you only file in one direction, which in this case, is away from you. Because of this filing direction, you must make sure no one is standing opposite you, or you may accidentally injure them with the file.

How to Use a Curved File

The curved file is used for filing curved edges, preparing them for sanding. The following is a video on how to use the curved file:


As mentioned in the video, the curved file is only to be used in one direction, which is downward. The curved edge makes it easy to get to curved edges and sand them with ease, and prepare them for sanding.

How to Use a Flat File

The flat file is used to file edges to prepare them for sanding. The following is a video on how to use the flat file:

The video explains that, like some other files, only use a downward filing motion. This will prepare your wood for sanding and will file out imperfections.

How to Use a Coarse File

The course file is used to file down large amounts of wood for a various amount of reasons. The following is a video on how to use the coarse file:

When using this type of file, you only file downwards, not upwards. Use your free hand to support the file, as the coarse file can sometimes be difficult to operate smoothly. Continue filing until the edge is filed to your liking. 

How to Use a Hack Saw

The hack saw is a saw used for cutting metal into pieces. The following is a video on how to use the hack saw:

As mentioned in the video, this saw is similar to the rip saw, in that the downward stroke is more forceful than the upward stroke. Like many other saws, you must make sure that no one is in the immediate vicinity when you are using this saw, as you could severely cut or hit someone with the saw.

How to Use a Tenon Saw

The tenon saw is used for cutting wood. Unlike other saws, you must hold it parallel to the floor. The following is a video on how to use the tenon saw:


As mentioned in the video, you use your free hand to guide the saw, and cut parallel to the floor. Like many other saws, you must make sure no one is in the immediate vicinity or else they could be severely injured by the saw.

How to Use a Rip Saw

A rip saw is used for manually cutting wood into pieces. The following is a video on how to use the rip saw:


As the video mentions, the most powerful cut using this saw is downward, then you lightly bring the saw back up, then another powerful downward motion. An extremely important safety precaution would be to make sure that there is no one in the immediate vicinity when using this saw. You could accidentally cut them or hit them with the saw and cause serious injury. 

How To Use an Electric Sander

An electric sander is used for achieving a smooth finish on wood faster than manual sanding. The following is a video on how to use and electric sander:


As mentioned in the video, it is very important that the sander is kept in constant anti-clockwise motion, or else a hole will be burned through the sand paper. It is also important that you keep your free hand holding the wood down for support, but also making sure you do not accidentally sand your hand with the sander, so make sure your free hand is not too close. 

How to Use A Hammer

A hammer is a very important tool in DT, as you will use it to hammer in and remove nails from wood. The following is a video on how to use a hammer:

To hammer in a nail, you must first tap lightly into the wood using the hammer to make sure it is in place. Then hit the nail into the wood using the hammer, making sure you do not hit your hands. Continue until the nail is completely hammered into the wood. To remove a nail, use the back end of the hammer to pry the nail loose. A helpful tip when removing nails, is that if a nail is too far in to pry loose, just hammer it in all the way to get it out of the way and continue working.

Wednesday 22 February 2012

How to Use a Drill Press

A drill press is used for drilling holes in wood as well as metal. The following is a video on how to use a drill press:

As stated in the video, you must hold down the piece of wood you are planning to drill a hole in securely with your free hand, then slowly lower the drill until in begins to drill through the wood. Continue lowering until the drill has fully gone through the wood. A useful tip when using the drill press would be to mark where you want the hole to be with a marker before drilling, as the hole will be more precise and in the correct position.

How to Change a Scroll Saw Blade

Changing a scroll saw blade is a very important skill to know when you are working in DT. The following is a video on how to do so:

Important tips to remember when changing a scroll saw blade:
- Make sure the machine is off before trying to loosen the blade, trying to change a blade while the machine is on is extremely hazardous and unsafe.
- Remember to always tighten clockwise, and loosen anti-clockwise. This makes changing a blade a lot quicker and easier instead of trying to work out which way to turn it.
- Make sure the blades are always facing downwards. If the blades are facing upwards, the wood or metal will begin to travel up the blade and cause damage to the machine and your design. 
- Always remember, after tightening the blade, you must loosen it slightly with three turns anti-clockwise so that the blade is not too tight.

How to Use the Jig Saw

The jig saw can be used to cut wood in half, straight lines, or even curvy lines or designs. The following is a video on how to safely use the jig saw:


When using the jig saw, it is important that the wood is securely clamped down with the F clamp, as well as using your free hand to hold down the wood for extra support, keeping it well away from the blade. You must make sure that the machine is completely level with the wood - not tilted up or down. Then you must hold down the trigger to start the machine and begin to cut the wood. Make sure that you apply a decent amount of downward pressure, or the machine with jump up - potentially causing injury. When you are done cutting the wood, release the trigger to stop the machine. You will have successfully cut a piece of wood using the jig saw.

How to Use a Hand Drill

The hand drill is used for drilling holes through wood for a variety of reasons. The following is a video on how to safely use the hand drill:

As mentioned in the video, the wood must be securely clamped down with the F clamp to stop the wood form spinning with the drill. Then you press the button and begin to drill the hole, applying downward pressure. Continue applying downward pressure until you drill completely through the wood. You should not put your hands anywhere near the drill, as it can severely injure your hand.

How to Use a Scroll Saw

Scroll saws are a machine used for cutting wood and metal. The following is a video explaining the basics of how to safely operate a scroll saw:


As the video explains, do not hold your wood/metal in the incorrect way (shown in the video), because if the wood was to slip, your thumbs would slide straight towards the blade and they would get cut. You must apply a decent amount of downward pressure to make sure the wood/metal does not jump up, and if you are working with metal, you must always spray a lubricant on the blade every few centimetres of cutting to ensure the blade does not start jumping and ruining your design. Follow these steps, and you will have an easy time using the scroll saw with no injuries or damage to your design.

General Safety

In DT, there are a number of safety rules that you must follow in order to use the machines and work safely. The diagram below will explain what gear you must wear in order to be safe:

Doing this, along with following the rules on signs at all times:


And always tying a knot in power chords:


Will ensure safety while working in Design Technology. 


Some other helpful safety tips are:
- Don't get too close to people working using saws or machines, they can loose concentration and hurt themselves, or they could accidentally hurt you. Keep a good distance from them and do not distract them.
- Do not leave chairs or other obstacles around the work area. This poses a trip hazard, and if someone trips in the work area, they may accidentally bump someone working on a machine and cause serious injury to themselves or others.
- Keep exposed chords or wires taped back or secured in some way so that people do not trip on them. Exposed wires can also be an electrical hazard, so do not touch exposed wires and inform a teacher immediately.